How to backup SQL Database [Simple ready to use script]
These are ready to use, simplest steps to start doing backups of SQL Database Server right now in the extra-cheap magnetic cloud storage📼. Just set it up and test that backups are there.
Scheduler already inside, you don't need to set up CRON jobs.
For best compatibility, we made our backup inside of the docker container (source is hosted on github), so this guide also covers simple steps to setup docker if you don't have it yet.
To store backups we will use AWS S3 Glacier:
According to Glacier pricing it costs only $0.004 per GB / Month in US regions. If your gzipped database takes 100Mb you can create a backup every week, and after a year you will collect ~5.2Gb of data so it will cost you only $0.02 per month after a year.
With this price you will never want to delete backups - it is cheaper just leave them there forever. Glacier provides 99.999999999% durability of data which means you can always be calm - your data will be there. Glacier uses extra-cheap storages like magnetic tapes/compact disks, which are served by some robots and stored in special storerooms, that's why data retrieval time may take up to several hours.
Source
- First, install docker. This is Ubuntu/Debian example, for other distros on OS use official guide:
sudo apt-get update
sudo apt-get install apt-transport-https ca-certificates curl  gnupg-agent software-properties-common
curl -fsSL https://download.docker.com/linux/debian/gpg | sudo apt-key add -
sudo add-apt-repository "deb [arch=amd64] https://download.docker.com/linux/debian $(lsb_release -cs) stable"
sudo apt-get update
sudo apt-get install docker-ce docker-ce-cli containerd.io
sudo systemctl enable docker
sudo systemctl start docker
- Next, install docker-compose (if you don't have it again, for more info use official guide):
sudo curl -L "https://github.com/docker/compose/releases/download/1.27.4/docker-compose-$(uname -s)-$(uname -m)" -o /usr/local/bin/docker-compose
sudo chmod +x /usr/local/bin/docker-compose
sudo ln -s /usr/local/bin/docker-compose /usr/bin/docker-compose
- Create file
docker-compose.ymlwith next content replacing values inside<>:
version: "3.0"

services:
  database_glacierizer:
    image: devforth/docker-database-glacierizer
    network_mode: host # we recommend bind ignoring Docker DNS to access manual
                   # management port easily form host
    environment:

      PROJECT_NAME: "YourApp"
      CRON: "0 4 * * 0"  # at 04:00 every Sunday

      DATABASE_TYPE: "MySQL"  # possible values [PostgreSQL, MySQL]
      DATABASE_HOST: "<host>"
      DATABASE_NAME: "<database_name>"
      DATABASE_USER: "<username>"
      DATABASE_PASSWORD: "<password>"

      MANUAL_MANAGEMENT_PORT: 33399 # optional

      SLACK_WEBHOOK: "https://hooks.slack.com/services/T00000000/B00000000/XXXXXXXXXXXXXXXXXXXXXXXX"
             # optional - to be notified about each backup result

      GLACIER_VAULT_NAME: "<vault_name>"

      AWS_S3_REGION_NAME: "us-east-1" # for US East (N. Virginia)
      AWS_ACCESS_KEY_ID: "<access_key>"
      AWS_SECRET_ACCESS_KEY: "<secret_key>"
To get GLACIER_VAULT_NAME and AWS params see below.
- Run it with the next command when you are in the same dir:
docker-compose up
Setup an AWS account and a Glacier bucket
1. Go to https://portal.aws.amazon.com/billing/signup#/start and create an account
2. Go to IAM Users and add a new user:

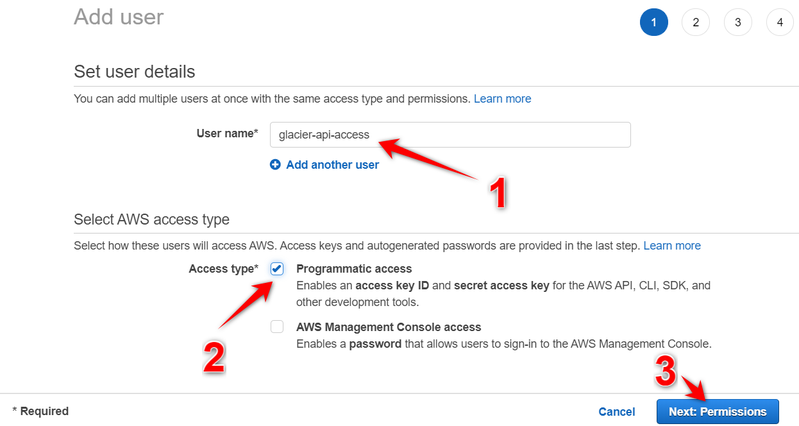
3. Type the username and set API access:

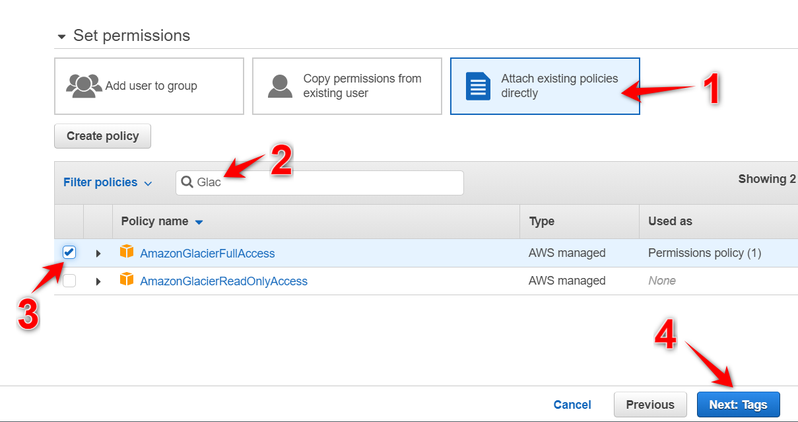
4. Add GlacierFullAccess:

5. Next, Next, Create User
6. Show API Key ID and Secret and use them in docker-compose.yml file

7. The last thing, create a Glacier Vault. Go here and create a new one with Create Vault button. Remember the vault name which you will enter to use in docker-compose.yml. Also, we recommend creating a vault in US East (N. Virginia) region🌎.
Trigger backup manually
In your project create a script do_live_backup.sh :
#!/bin/bash

MANAGEMENT_PORT=33399
DAEMON_HOST=51.158.76.244

set -e

ssh -tt -L $MANAGEMENT_PORT:127.0.0.1:$MANAGEMENT_PORT root@$DAEMON_HOST > /dev/null &
PID=$!

sleep 1
curl http://127.0.0.1:$MANAGEMENT_PORT
kill $PID
Add execution permission:
chmod +x do_live_backup.sh
Now you can run this script to immediately trigger backup.
