CRUD in python [Simplest example]
Create simple flask application with SQLite database
In this example, we will use one of the popular python frameworks. We will implement simple logic for user management (create, update, delete, get). For testing, we will use Postman instead of the browser so we don't need any frontend templates.
Installing necessary packages.
pip3 install flask
pip3 install sqlalchemy
File header (all hint's code blocks store in the same file).
import flask

from flask import request

from sqlalchemy import create_engine, MetaData, Table, Column, Integer, String

app = flask.Flask(__name__)

eng = create_engine("sqlite:///:memory:", connect_args={'check_same_thread': False})
meta = MetaData()

users = Table(
    "user", meta,
    Column('id', Integer, primary_key=True),
    Column('name', String),
    Column('age', Integer)
)

meta.create_all(eng)
connection = eng.connect()
Create user route.
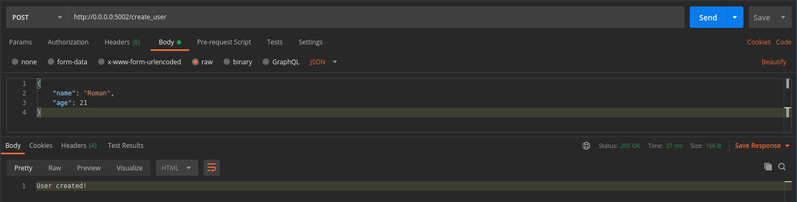
@app.route('/create_user', methods=['POST'])
def create_user():

    name = request.json.get("name", "Bob")
    age = request.json.get("age", 18)

    ins = users.insert().values(name=name, age=age)
    connection.execute(ins)

    return "User created!"
How create_user looks in Postman:
Get user route.
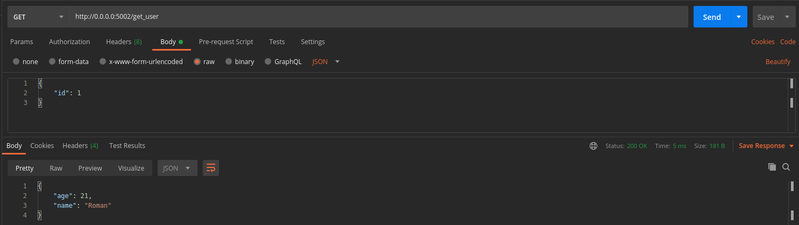
@app.route('/get_user', methods=['GET'])
def get_user():
    user_id = request.json.get("id", None)
    user_select = users.select().where(users.c.id == user_id)
    user = connection.execute(user_select).first()
    if user:
        result = {
            "name": user.name,
            "age": user.age
        }
    else:
        result = "User not found!"

    return result
How get_user looks in Postman:
Update user route.
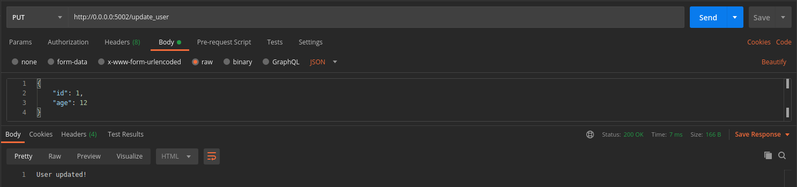
@app.route('/update_user', methods=['PUT'])
def update_user():

    id = request.json.get("id", None)
    name = request.json.get("name", None)
    age = request.json.get("age", None)

    to_update = {}
    if name:
        to_update["name"] = name
    if age:
        to_update["age"] = age
    if to_update:
        user_update = users.update().where(users.c.id == id).values(**to_update)
        connection.execute(user_update)

    return "User updated!"
How update_user looks in Postman:
Delete user route.
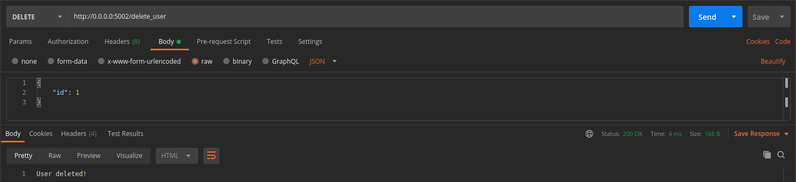
@app.route('/delete_user', methods=['DELETE'])
def delete_user():

    id = request.json.get("id", None)

    user_delete = users.delete().where(users.c.id == id)
    connection.execute(user_delete)


    return 'User deleted!'
How delete_user looks in Postman:
Runnable part of the application. It is must be at the end of the file.
app.run(host='0.0.0.0', port=5002, debug=True)
You can use this way for running your application only if you know that there are no many connections that can call at the same time your application. For example for local development. On the other way, you need to use WSGI.
Using WSGI for serving application
WSGI (Web Server Gateway Interface) - interface specification by which server and application communicate.
This allows processing thousands of requests at the same time. Flask support WSGI specification so we can easily run our application using one of WSGI technology (Gunicorn, uWSGI, CherryPy, etc). For example, we will use Gunicorn. You can install Gunicorn using pip package. Use the next command:
pip3 install gunicorn
After installation, we can remove app.run() and run the application using the next command:
gunicorn -w 4 -b 0.0.0.0:5002 my_app:app
-w (Workers) - The number of worker processes. This number should generally be between 2-4 workers per core in the server.
-b (bind) - Allows us to bind custom free host:port (by default 127.0.0.1:8000)
After running this command we will get the same output as without WSGI but duplicated as many times as we specified in the -w params.
Creating a simple web application using aiohttp package, SQLite database, and JWT token authorization.
In the previous chapter, we use the Flask framework but aiohttp is not a framework. Nevertheless, it is a powerful tool for writing web applications. In addition, you can write your own frameworks using this package. Also in this application, we will add a simple authorization logic.
Application logic is similar to in the previous chapter but instead of users, we will manage cars. Also, we will create a login route that will authorize the user and make it possible to use other routes.
Installing necessary packages.
pip3 install aiohttp
pip3 install sqlalchemy
File header
import jwt
from aiohttp import web
from aiohttp.web_response import json_response
from sqlalchemy import create_engine, MetaData, Table, Column, Integer, String, select
from sqlalchemy.ext.declarative import declarative_base

Base = declarative_base()
metadata = MetaData()
engine = create_engine('sqlite:///:memory:', echo=True)
app = web.Application()

cars = Table('car', metadata,
             Column('id', Integer, primary_key=True),
             Column('brand', String),
             Column('name', String),
             Column('year', Integer),
             )

metadata.create_all(engine)

JWT_SECRET = 'secret' # Some secret string that will be used for creating JWT token
JWT_ALGORITHM = 'HS256'
JWT_EXP_DELTA_SECONDS = 20 # Time after which the token will expire.
USER = 'admin'
PASSWORD = 'qwerty'
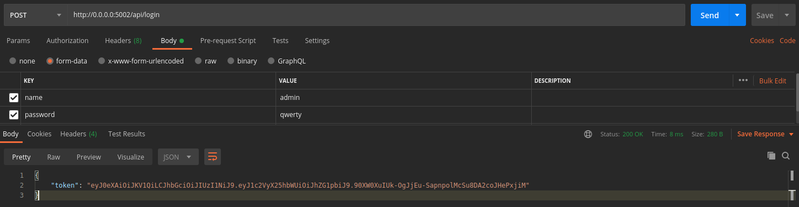
Login route.
async def login(request):
    post_data = await request.post()
    if post_data['name'] != USER or post_data['password'] != PASSWORD:
        return json_response({'error': 'Wrong password or username'}, status=400)

    body = {
        'user_name': post_data['name'],
    }
    jwt_token = jwt.encode(body, JWT_SECRET, JWT_ALGORITHM)
    return json_response(data={'token': jwt_token.decode('utf-8')})
In Postman send name and password as form data!
For the simpler realization, we don't use the database to store user entries. Instead of this, we have a single static user with name='admin' and password='qwerty'.
For the other routes, we need to add an Authorization header and set generated token as its value! If you try to use these routes without a token you will get an Empty token message or Token is invalid if you send the wrong token.
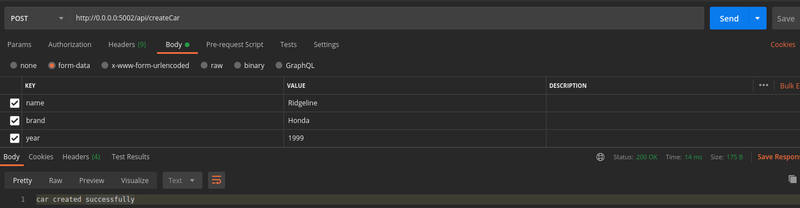
Create car route.
async def create_car(request):
    jwt_token = request.headers.get('Authorization', None)
    if not jwt_token:
        return json_response({'message': 'Empty token'}, status=400)
    else:
        try:
            payload = jwt.decode(jwt_token, JWT_SECRET, algorithms=[JWT_ALGORITHM])
        except (jwt.DecodeError, jwt.ExpiredSignatureError):
            return json_response({'message': 'Token is invalid'}, status=400)
    data = await request.post()
    ins = cars.insert().values(name=data['name'], brand=data['brand'], year=data['year'])
    conn = engine.connect()
    conn.execute(ins)
    return web.Response(text="car created successfully")
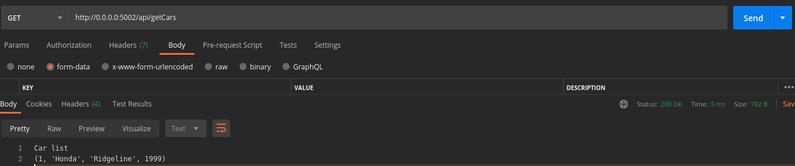
Get cars list route.
async def get_cars_list(request):
    jwt_token = request.headers.get('Authorization', None)
    if not jwt_token:
        return json_response({'message': 'Empty token'}, status=400)
    else:
        try:
            payload = jwt.decode(jwt_token, JWT_SECRET,
                                 algorithms=[JWT_ALGORITHM])
        except (jwt.DecodeError, jwt.ExpiredSignatureError):
            return json_response({'message': 'Token is invalid'}, status=400)
    text = "Car list\n"
    conn = engine.connect()
    s = select([cars])
    result = conn.execute(s)

    for row in result:
        text += str(row) + "\n"
    return web.Response(text=text)
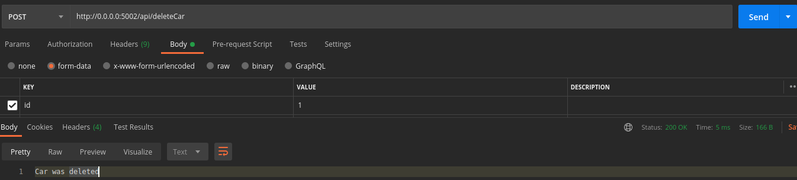
Delete car route.
async def delete_car(request):
    jwt_token = request.headers.get('Authorization', None)
    if not jwt_token:
        return json_response({'message': 'Empty token'}, status=400)
    else:
        try:
            payload = jwt.decode(jwt_token, JWT_SECRET,
                                 algorithms=[JWT_ALGORITHM])
        except (jwt.DecodeError, jwt.ExpiredSignatureError):
            return json_response({'message': 'Token is invalid '}, status=400)
    data = await request.post()
    conn = engine.connect()
    conn.execute(cars.delete().where(cars.c.id == data['id']))
    return web.Response(text="Car was deleted")
Runnable part.
Before running our application we need to add to it all routes that we created.
app.add_routes([web.get('/api/getCars', get_cars_list),
                web.post('/api/createCar', create_car),
                web.post('/api/deleteCar', delete_car),
                web.post('/api/login', login),
                ])
web.run_app(app, host="0.0.0.0", port=5002)
We can also use Gunicorn WSGI for this like for the Flask application from the previous chapter.
gunicorn -w 4 -b 0.0.0.0:5002 car_app:app