Easy practical guide to serverless framework with AWS

Serverless is a framework to create easily scalable web applications with fair costs in the cloud. The idea is to deploy your code to the cloud provider and say "hey, run it on what you want but execute it within predictable timing every time when the user needs it". So you don't have to create your VPS or dedicated server and wait until the growing business will bottleneck it (all RAM or CPU or Storage will be exhausted).
This step-by-step guide will allow you to create your first REST API and deploy it to the AWS cloud. Moreover, I will make detailed comments based on my expertise in onboarding developers into new technologies. I will try to use simple language but please ask in the comments if something is still not clear or does not work (it will help us both: you will understand the topic and I will understand how to explain better).
Setting up a project
For best compatibility, I recommend using Linux Ubuntu 20.04+ or WSL 2 on Windows, which also can run Ubuntu.
First of all, we need NodeJS. If it is not installed yet, run
sudo apt install -y nodejs
Now install the latest version of serverless framework:
sudo npm i -g serverless@latest
This will install the latest version of serverless globally into your system.
Now you can check the version and make sure serverless CLI is available:
| serverless --version | |
| Framework Core: 2.57.0 | |
| Plugin: 5.4.4 | |
| SDK: 4.3.0 | |
| Components: 3.17.0 |
Now go to the parent folder where you want to create a project folder and run serverless command
serverless
Select the next template:
AWS - Node.js - REST API
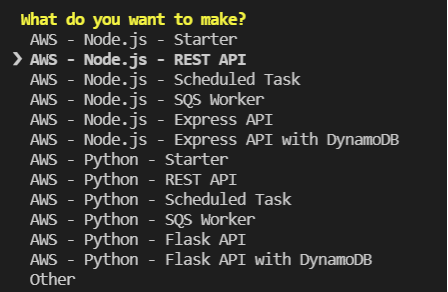
Press Enter. Then type in the project name or use the default one.
We will not use Serverless Dashboard, so type n:

Enter project dir and run Visual Studio Code:
| cd aws-node-rest-api-project/ | |
| code . |
Now we need to create an AWS Profile. A Profile is a named pair of KEYS that you define in ~/.aws/credentials file. This file might not exist on your system but you can easily create it and open for edit in VSCode:
code ~/.aws/credentials
You should add the next lines there:
| [devforthAccount] | |
| aws_access_key_id = ABCDXXXXXXXXXXXXXXXEF | |
| aws_secret_access_key = QAbc12fsafsafsa12231312d1221312312321321 |
Here devforthAccount is profile name. Actually, you can use any name since it is needed only to select a certain profile if you have multiple profiles defined in the file.
☝ Multiple profiles in ~/.aws/credentials are used when you need to access to multiple AWS accounts: e.g. you have one account where you develop your app and other account for your client which you use to deploy production version of app. All resources that you allocate inside of one account are always paid from one common balance: so you pay AWS almost nothing because you have no payload and your client pays more if he has real payloads
If you are working in someone else's account you have to ask them to create a user for you and provide you CSV file with Access Key Id and Access Secret Key. Otherwise, you can create your own account and API user like described here: How to create account and user for API access.
Now run the command which will deploy the app into the cloud:
serverless deploy --aws-profile devforthAccount --region us-east-1
After deployment is done you will get an API endpoint where your app was deployed:
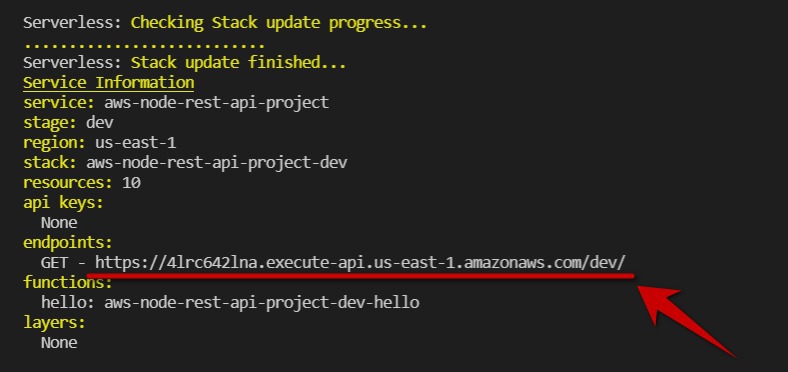
In future if you wish, you will be able to host this API on your own domain, e.g. api.yoursite.com. This could be done for example using AWS ELB Service
So API is deployed and now we can try to call it using plain curl:
curl -X GET https://<youapibase>.execute-api.us-east-1.amazonaws.com/dev/ -w "\nstatus: %{http_code} \n"
So basically our output returns a response which is defined in our .js source file:
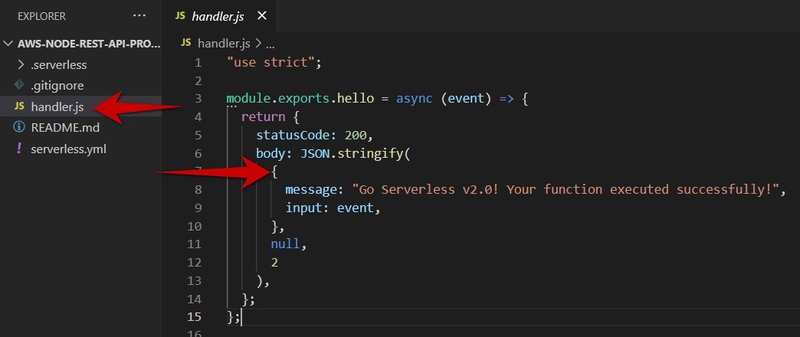
As you can see handler.js "exports" one function with the name hello. You can export as many as you need.
Function mapping to API path configured in serverless.yml file:
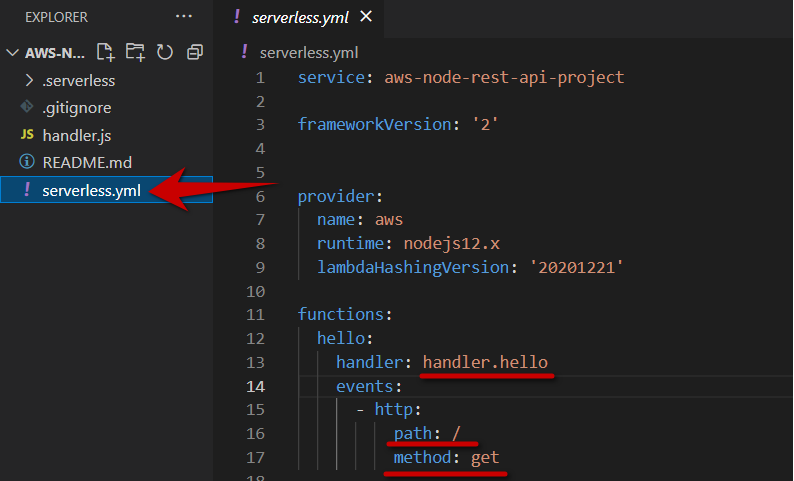
Pay attention to functions: section.
YAML (.yml) format is tabulation sensitive: whitespaces define level of structure. It is like JSON but better: you don't need brackets to define structure, you can write a comments which are not possible in JSON
Overview of involved services and their resources
In this section, we will see which AWS resources were involved when serverless deployed our app.
First of all, you need to login into your account in AWS Console with a username and password (if you got CSV credentials file you should use the link from CSV file to log in).
😕 AWS Console is just a website https://aws.amazon.com/console/. I know you might think that all consoles must be a text-based like a Terminal or Command line prompt but it is not true. AWS just calls their graphical dashboard for all resources management "AWS Console"
Basically, the AWS console is a set of pages split by so-called services. You will understand what the service is soon.
Before working with resources we need to select Data Center where we work. AWS calls their data centers "Regions", and you should select Data Center in the top right corner:
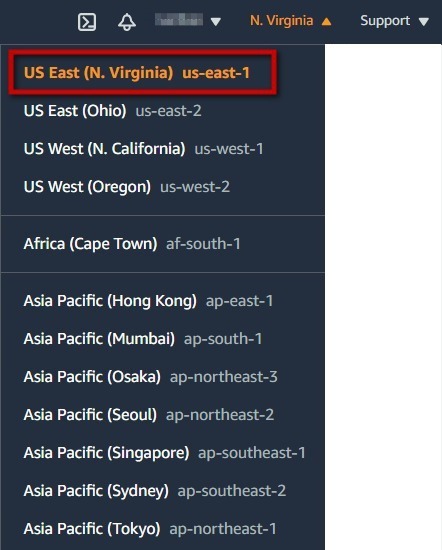
Since we deployed our app into us-east-1 , we need to select N. Virginia here.
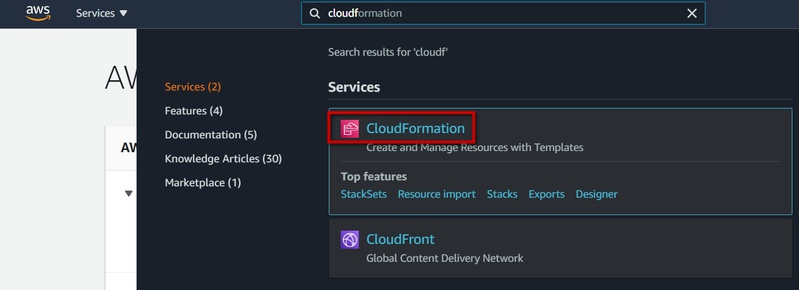
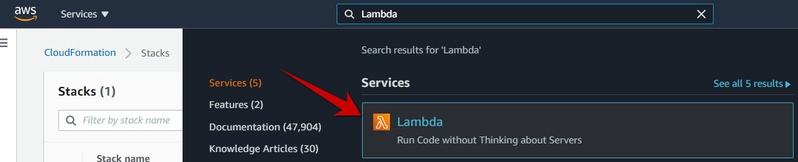
Serverless scripts create some resources in a cloud using a special CloudFormation Service. You can navigate to the service page by typing service name in the search field:
Here we see our stack. One serverless project is deployed using one CloudFormation Stack.
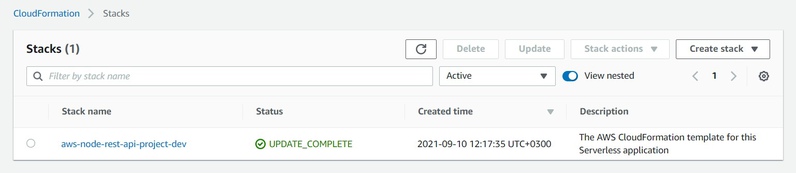
If you want to release all taken resources back to AWS to make sure AWS does not bill you anymore - safest way is doing it here (just select stack using radio button and click Delete). Hovever if you have some resources which might store your dynamic data then you will be asked about deleting such data manually before destroying resources. In such way AWS protects you from loosing data
Click on stack name and navigate to Resources tab:
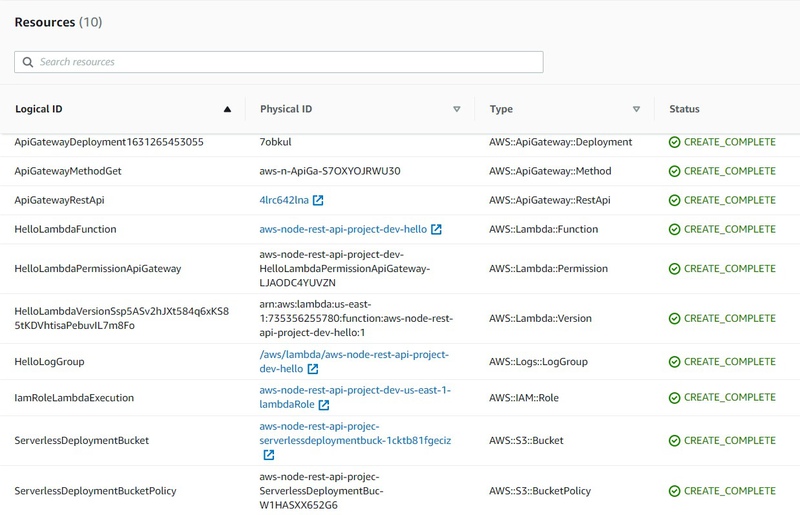
As you can see serverless framework created 10 resources for our app which has only one simple GET API endpoint 😲. But it is totally fine.
Pay attention to the Type column. Values in this column could be found in a web search if you don't know what resource is used for. Also, these are set of minimal "required" resources for the serverless apps. In the future you will learn how to create such resources by yourself for custom purposes (not only API, but much more complex things), so you will need to know how to configure them and which attributes they support in configuration.
Type format is next:
AWS::<Service Name>::<Resource Name>
So now remember how type looks. How we can use it? Consider "AWS::S3::Bucket". We know that Service Name is S3. Let's assume we don't know what S3 service does. Just type in web search "AWS S3" and Wikipedia instantly helps:
Amazon S3 or Amazon Simple Storage Service is a service offered by Amazon Web Services that provides object storage through a web service interface. Amazon S3 uses the same scalable storage infrastructure that Amazon.com uses to run its global e-commerce network.
Now search for "AWS::S3::Bucket" on the web. You will find this page on the official AWS CloudFormation doc page: https://docs.aws.amazon.com/AWSCloudFormation/latest/UserGuide/aws-properties-s3-bucket.html. You will see the settings of the bucket resource and can get extra info.
Task 1: Find some information about ApiGateway, Lambda, IAM, Logs. Paste this information into a new hint with an answer (press Red plus button below to create a new hint).
Task 2. Find a CloudFormation documentation page for a function object of lambda service on cloudformation official website. Using this page, answer to the question: "which programming languages could be used in lambda apart JavaScript to code lambdas". Paste screenshot of such information into the hint.
Now when we know which Services are involved we can use AWS Console to inspect the items. Hope you already learned the lesson but just in case will repeat: to navigate the service page in AWS Console just type service name in search:
You will see the dashboard on the Lambda service page. Don't hurry up, look around, click and read sections, go to the functions list:
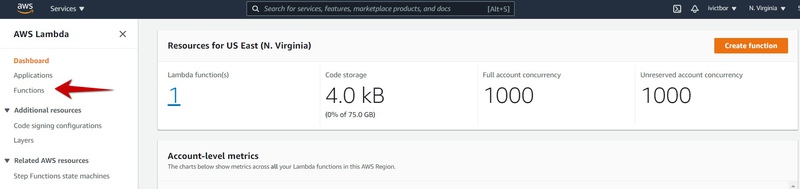
You need to do it to get used to AWS UI so in the future it will be simpler to navigate here.
You will probably also notice that all resources could be just created in AWS Console by mouse clicking. And you can configure them in the console directly. So... yes... the same app we created with a serverless framework could be implemented in AWS Console without leaving one browser tab. But why we use serverless:
- First of all, it deploys all resources automatically and saves us a lot of time
- We can deploy our app into our account and then deploy it to the client's account and be sure that all resources are absolutely the same (manual clicking creates a lot of mistakes)
- All things which we do in serverless.yml might be committed into git and we will clearly see who changed what and when. If someone from your team will change something using AWS Console you might not find it at all.
- We can even reuse the same code to deploy the app a second time into the same account (e.g. create a development environment and prod environment)
- Serverless already generates and configures some basic resources for us
🤔 Sometimes it is okay to use AWS Console to change one attribute of one resource and see what will happen. This can save some time on deployments, but it is better stick with only to changing serverless.yml and redeploing. At least unless you will spend some time with AWS. However always use AWS console to check what was deployed by serverless framework and how.
Attaching Database to our API
Well, for now, we created a so-called stateless API that returns static data. No practical value at all but it was simple enough to start. Now let's attach some storage to persist state. As a simple task example, let's implement notes storage.
Let's change serverless.yml to the next:
| service: aws-node-rest-api-project | |
| frameworkVersion: '2' | |
| # Settings declared under provider section here are common for all functions | |
| provider: | |
| name: aws | |
| runtime: nodejs12.x | |
| lambdaHashingVersion: '20201221' | |
| iam: | |
| role: NoterLambdaRole | |
| environment: | |
| NOTES_TABLE_NAME: | |
| Ref: NotesDynamoDBTable | |
| functions: | |
| # This function will add note | |
| addNote: | |
| handler: handler.addNote | |
| events: | |
| - http: | |
| path: /add/ | |
| method: put | |
| # This function will return all notes | |
| listNotes: | |
| handler: handler.listNotes | |
| events: | |
| - http: | |
| path: /list/ | |
| method: get | |
| resources: | |
| Resources: | |
| # This is how we declare table which is DynamoDB service | |
| # as you can see from Type value | |
| NotesDynamoDBTable: | |
| Type: AWS::DynamoDB::Table | |
| Properties: | |
| TableName: NotesDynamoDBTable | |
| # Might look unusual, but here we need to define only attributes | |
| # used in KeySchema, because Dynamo is schemaless Database | |
| # so it does not mean that table will have only one attribute (one column), | |
| # you can just insert to table any other columns during adding items | |
| # to table and it will work | |
| AttributeDefinitions: | |
| - AttributeName: noteId | |
| AttributeType: S | |
| KeySchema: | |
| - AttributeName: noteId | |
| KeyType: HASH | |
| BillingMode: PAY_PER_REQUEST | |
| # This is a role which will be attached to Lambda. Lambdas will work with | |
| # DynamoDB Service so we need to allow access in the role | |
| NoterLambdaRole: | |
| Type: AWS::IAM::Role | |
| Properties: | |
| RoleName: NoterLambdaRole | |
| AssumeRolePolicyDocument: | |
| Version: '2012-10-17' | |
| Statement: | |
| - Effect: Allow | |
| Principal: | |
| Service: | |
| - lambda.amazonaws.com | |
| Action: sts:AssumeRole | |
| Policies: | |
| - PolicyName: DynamoDBWriteAccess | |
| PolicyDocument: | |
| Version: '2012-10-17' | |
| Statement: | |
| - Effect: Allow | |
| Action: | |
| - logs:CreateLogGroup | |
| - logs:CreateLogStream | |
| - logs:PutLogEvents | |
| Resource: | |
| - 'Fn::Join': | |
| - ':' | |
| - | |
| - 'arn:aws:logs' | |
| - Ref: 'AWS::Region' | |
| - Ref: 'AWS::AccountId' | |
| - 'log-group:/aws/lambda/*:*:*' | |
| - Effect: Allow | |
| Action: | |
| - dynamodb:PutItem | |
| - dynamodb:Scan | |
| Resource: | |
| 'Fn::GetAtt': [ NotesDynamoDBTable, Arn ] |
Carefully read it line by line. Trust me, it is not so much info as you think but if you will read several times and start thinking of what is happening on there, you will start on your way to become a cloud specialist.
Please note, this heavy construction joins multiple string parts using colon character ":":
| - 'Fn::Join': | |
| - ':' | |
| - | |
| - 'arn:aws:logs' | |
| - Ref: 'AWS::Region' | |
| - Ref: 'AWS::AccountId' | |
| - 'log-group:/aws/lambda/*:*:*' |
Also, it could be simplified into a one-liner using the next syntax if you wish:
!Join [':', ['arn:aws:logs', Ref: 'AWS::Region', Ref: 'AWS::AccountId', 'log-group:/aws/lambda/*:*:*']]
As you can see we define 2 functions and map them to 2 endpoints. A new section for you is resources: . This section is the way for you to add custom resources to the CloudFormation stack. This gives you great power. There are plenty of different resources in AWS which you can use as constructor blocks. Some of them are doing big data processing, some implement neural deep-learning networks for you so you don't need deep knowledge, some allow run extra powerful batch computing. They have literally already implemented everything: TTS + STT systems, different databases, storage of all kinds (fast and costly, slow and cheap, cheap and less reliable, and so on). And all these things you can just describe in the resources section and integrate writing your code in lambdas.
So that was DevOps part, now we are moving to a programming part where we replace the content of the file handler.js with this code:
| "use strict"; | |
| const AWS = require('aws-sdk'); | |
| const dbClient = new AWS.DynamoDB.DocumentClient(); | |
| module.exports.addNote = async (event) => { | |
| const requestBody = JSON.parse(event.body); | |
| await dbClient.put({ | |
| TableName: process.env.NOTES_TABLE_NAME, | |
| Item: { | |
| noteId: requestBody.noteId, | |
| text: requestBody.text, | |
| addedTime: new Date().toISOString(), | |
| }, | |
| }).promise(); | |
| return { | |
| statusCode: 200, | |
| body: JSON.stringify({itemWasAdded: true}), | |
| }; | |
| }; | |
| module.exports.listNotes = async (event) => { | |
| console.log('listNotes is called 🔥') | |
| const dynamoDBResponse = await dbClient.scan({ | |
| TableName: process.env.NOTES_TABLE_NAME, | |
| }).promise(); | |
| return { | |
| statusCode: 200, | |
| body: JSON.stringify({ | |
| notes: dynamoDBResponse.Items | |
| }), | |
| }; | |
| }; |
Here we import aws-sdk using require function. AWS SDK is a special npm package required to interact with all AWS resources. It is already preinstalled on all NodeJS Lambdas. However, it also can be executed from any other host (e.g. your local machine or dedicated server) but in such a use-case, you should also explicitly configure Access Key ID and Access Secret Key to authorize API calls. Lambda authorizes all calls on behalf role configured in serverless.yml. Here we can see 2 calls to DynamoDB. For example put adds a new item to the table:
| await dbClient.put({ | |
| TableName: process.env.NOTES_TABLE_NAME, | |
| Item: { | |
| noteId: requestBody.noteId, | |
| text: requestBody.text, | |
| addedTime: new Date().toISOString(), | |
| }, | |
| }).promise(); |
Item defines an object with all attributes which we will store in the item.
If you are familier with relational databases like MySQL or PostreSQL, DynamoDB might confuse you: here we have no schema, no strict types, which means you can define any attributes in any item. E.g. you can create one item with attributefield1and put integer value into it, another item in the same table might have string infield1and third item might be saved withoutfield1at all but might have afield2which never was saved in other items
If you don't know how to interact with some new AWS service you need to start by searching in web "AWS SDK <ServiceName>", e.g. if you don't know how to delete an item from DynamoDB table, type in search engine "aws sdk dynamodb", you will get this page. Now just use Ctrl+F "delete" on the page.
Redeploy app again using the same command which we used the previous time:
serverless deploy --aws-profile devforthAccount --region us-east-1
After deployment is done, test deployed API:
curl -X PUT -H "Content-Type: application/json" -d '{"noteId":"1", "text":"Test1"}' https://<yourapibase>.execute-api.us-east-1.amazonaws.com/dev/add -w "\nstatus: %{http_code} \n"
After the request is completed you should see a response returned by Lambda:
{itemWasAdded: true}
Now we can call list API:
curl -X GET https://<yourapibase>.execute-api.us-east-1.amazonaws.com/dev/list -w "\nstatus: %{http_code} \n"
And we see the list with all items:
{"notes":[{"addedTime":"2021-09-11T12:24:14.455Z", "text":"Test1", "noteId":"1"}]}
Debugging lambdas
We intentionally added console.log call into listNotes function. But where does it go?
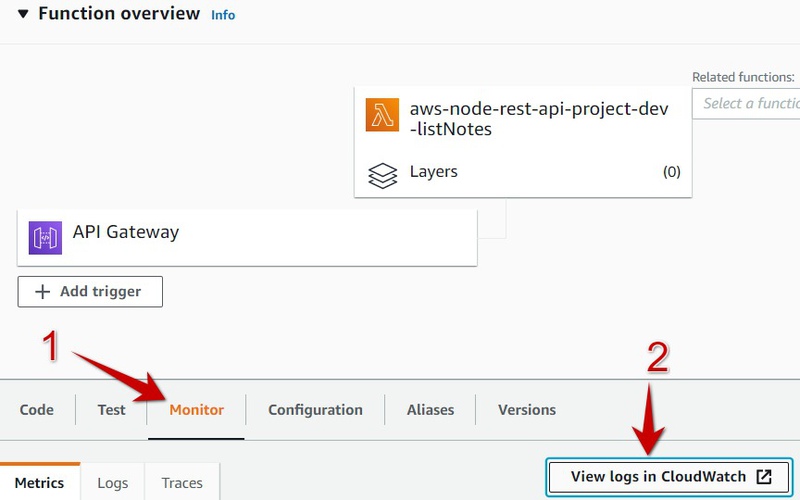
Go to AWS console to Lambda Service Page, open function which is used to list notes, select Monitor and press View Logs in CloudWath:
Click on the most recent log stream:
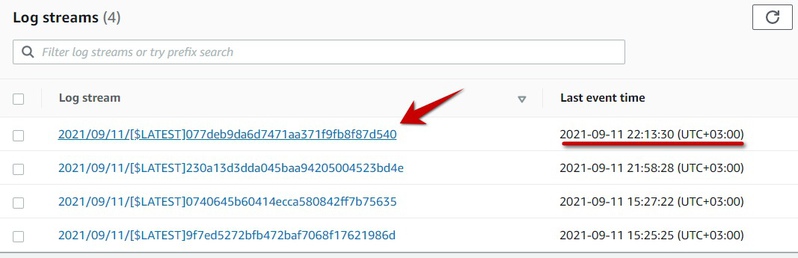
You should see our console.log output:

So this is already enough for you to check the values of some variables in run time. Also if some exception will be thrown in lambda code or in modules imported by lambda it will also flow up here. So if Lambda returns a wrong response (e.g. status non 200) go here and see what is going on.
Task 3. Go to AWS Console and write down how many resources exists in cloudformation stack now, compare with previous screenshot and write down which resources were added (add info to the hint with answers).
Task 4. Temporary remove "put item" permission from the role defined inserverless.yml(dynamodb:PutItemand redeploy app, see what will happen if you call ). Try to add a new note with a curl now. Make screenshot of the error returned by curl. Check CloudWatch logs of Lambda, you should see some permission error there also. Make screenshot too
Task 5. Add new function and new endpoint (HTTP request method should be DELETE ) which deletes a note by noteId, after testing attach code to the answer
Final Task number 6
This is the most complex one, plus it covers all knowledge you've got in the post. So I created a dedicated section for it that has additional details and tips.
Task 6. Adjust the /add endpoint so it can accept a new input parameter called "noteImageBase64" (string). If it is passed in request body, then upload the file on s3 bucket (define new bucket in serverless.yml which will store the images), and after upload save full public URL which points to image in table item. If you open such URL in browser you should see image in browser tab.To test you can use this call:
curl -X PUT -H "Content-Type: application/json" -d '{"noteId":"1", "text":"Test1", "noteImageBase64": "data:image/jpeg;base64,/9j/4AAQSkZJRgABAQAAAQABAAD/2wBDAAIBAQEBAQIBAQECAgICAgQDAgICAgUEBAMEBgUGBgYFBgYGBwkIBgcJBwYGCAsICQoKCgoKBggLDAsKDAkKCgr/2wBDAQICAgICAgUDAwUKBwYHCgoKCgoKCgoKCgoKCgoKCgoKCgoKCgoKCgoKCgoKCgoKCgoKCgoKCgoKCgoKCgoKCgr/wgARCAAMABEDAREAAhEBAxEB/8QAFwAAAwEAAAAAAAAAAAAAAAAABgcICf/EABgBAAMBAQAAAAAAAAAAAAAAAAQFBwMG/9oADAMBAAIQAxAAAAB8WKdk4u+qkq7uGniKlVbNsiGf/8QAKhAAAAYBAgQFBQAAAAAAAAAAAQIDBAUGBwgRAAkSFBATFTFSFiJTlNL/2gAIAQEAAT8Ax9kjKGN+WKtzQK9qRvX1rAXwyT6NlLSs5jJtsMsRoLZZsqJgH7T9W4fDi3ZWl8ocx3M9KurDU/OMId9AhCRmE3yhkoPuGRDn70plSggQR2Eol+CvHpDX8rr91X+uMJcj3TFSrE0qtizRly4UynWUJuHxxa7a3UgO/Mc5wXVaoNEfNEDjvsY2w+xgMUxgHDejjF+D9RmU9TtTm51xP5cWjFLG0kXaJ2bUWKB0UgakIkU5AMBxE/WdTcfbp8P/xAAlEQABBAECBQUAAAAAAAAAAAABAgMEEQASYQUGEyGBEBUicZH/2gAIAQIBAT8AlSoEvj/tDkdvoqR2IQApJ0k2FDfI0huFy3F6IjhVL1F1ItVKNV2N+ds1q2/BjvME1wFYSlKlCioD5V93j859+M2wqtLd15Pp/8QAJBEAAQMEAQMFAAAAAAAAAAAAAQIDEQAEEiEFEBNRFSJBcfD/2gAIAQMBAT8AYFyxw/qKXl9wK2ColJGUQQadzuOYfDneIGMBsnUj53qsR+NM8DaNqCSpSkpMhJPtn6gUxZMsXLj6SZXE+NeOn//Z"}' https://<yourapibase>.execute-api.us-east-1.amazonaws.com/dev/add
This task could be done if you followed and analyzed everything I wrote in the post above. The aim of this task is to check how carefully you have read it and how much effort spent on analyzing documentation. Now it is your turn to see how you can find and understand Amazon's documentation. However, I will still give a piece of advice:
- To cheat a little bit and understand how you can upload a file from a base64 string, type in web search "upload file from base64 to s3 nodejs" to get some clues. Generally, StackOverflow can help with it, however, remember there may be different programming languages in lambdas, so you need some indicator that answers are related to NodeJS.
- By default, S3 makes all objects private to protect data, and also there are 2 levels of this "privacy lock": you need to allow public access for a whole bucket (you should do it in the S3 bucket definition in the resources section of
serverless.yml, search for CloudFormation doc forS3::Bucketresource to learn how to change AccessControl attribute), then you should also make each uploaded image public, this one should be done on AWS SDK side so you have to go to AWS SDK documentation to read how to do it. - After the object is made public you can execute your endpoint using the example above, go to AWS Console, navigate S3 bucket and find the file (there is a web file explorer), then you can get a public URL of an image by clicking. Based on this you will learn how to form a public URL string to store it in the database.
- Use this lifehack to help yourself with serverless when something is not working
Thanks for reading! Leave your questions or possible issues you are facing in the comments, leave links to the answers as well to get a private link to the next private hint which will boost your serverless level!